Beveling
For the most part, everything has some kind of beveled edge. This table has a very defined beveled edge. The keyboard keys have more of a micro-bevel. Look around you at various objects and their edges. How does the light react with the edges? We are going to bevel a cube giving it more of a realistic edge. Beveling an objects edges plays with how the light reacts with it and gives it the illusion of more depth. I also generally assign a blin material, this help to see the bevel results.
To bevel an edge, you must right click (RMB) on the object and switch to Edge mode using the pop-up menu. Once you are in the Edge mode you can select any edge you want then bevel it. In this case, we are going to select one from each horizontal ring and use another tool to select the rest for us or you can just manually select them all. Ha! To select multiple edges at one time, hold down the {shift} button and continue to select.
Since we have a continuous ring of edges, a faster way to select them is to select an edge a number of edges, {CTRL RMB}, chose the Edge Loop Utilities > To Edge Loop. This will select all the edges in this loop.
Before we Bevel the edges, lets change the material to one that adds a specular highlight. This will help us see the beveled edge result. The material by default will be Lambert, change it to Blin. Right click (RMB) on the mesh and
choose Assign New Material > Blin.
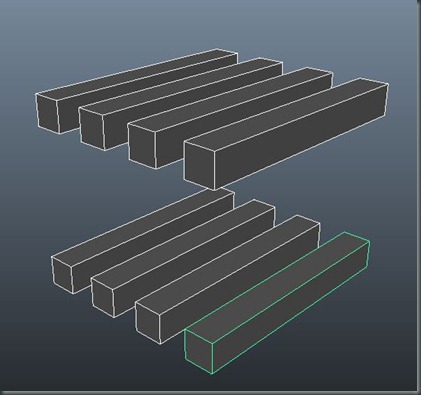
Create 4 cubes change the length to 8 units and space them 2 units apart.
Duplicate the 4 cubes and move them 5 units below.

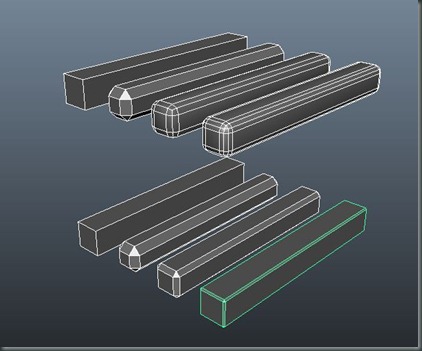
*Change Bevel settings to Absolute and start with a bevel offset of 0.05
Top Row: Bevel all the edges
1st Cube Top Row: Nothing
2nd Cube Top Row: Bevel all edges with 1 segment.
3rd Cube Top Row: Bevel all edges with 2 segments.
4rth Cube Top Row: Bevel all edges with 3 segments.
1st Cube Bottom Row: Bevel all edges with an Offset of 0.05 units.
2nd Cube Bottom Row: Bevel all edges with an Offset of 0.03 units.
3rd Cube Bottom Row: Bevel all edges with an Offset of 0.01 units.
4rth Cube Bottom Row: Bevel all edges with an Offset of 0.005 units.

Turn in 2 images to your blog,
1. A shot of the 8 selected cubes showing the edges.
2. A shot of the cubes, not selected, and with the smooth preview active.
In a new Maya project, create 4 new cubes change the length to 8 units and space them 2 units apart.
1st Cube: Bevel all edges, use offset of 0.05 units.
2nd Cube: Bevel the edges on the ends, use offset of 0.05 units.
3rd Cube: Bevel just the edges on the sides, use offset of 0.05 units.
4rth Cube: Do not Bevel.
Bevel:

After the Smooth Preview. < 3 > on the Keyboard
* Look how the bevels are interpreted when the smooth preview is active and check out how you can use it to better control your geometry.


Turn in 2 images to your blog,
1. A shot of the 4 selected cubes showing the edges.
2. A shot of the cubes, not selected, and with the smooth preview active.
For the most part, everything has some kind of beveled edge. This table has a very defined beveled edge. The keyboard keys have more of a micro-bevel. Look around you at various objects and their edges. How does the light react with the edges? We are going to bevel a cube giving it more of a realistic edge. Beveling an objects edges plays with how the light reacts with it and gives it the illusion of more depth. I also generally assign a blin material, this help to see the bevel results.
To bevel an edge, you must right click (RMB) on the object and switch to Edge mode using the pop-up menu. Once you are in the Edge mode you can select any edge you want then bevel it. In this case, we are going to select one from each horizontal ring and use another tool to select the rest for us or you can just manually select them all. Ha! To select multiple edges at one time, hold down the {shift} button and continue to select.
Since we have a continuous ring of edges, a faster way to select them is to select an edge a number of edges, {CTRL RMB}, chose the Edge Loop Utilities > To Edge Loop. This will select all the edges in this loop.
Before we Bevel the edges, lets change the material to one that adds a specular highlight. This will help us see the beveled edge result. The material by default will be Lambert, change it to Blin. Right click (RMB) on the mesh and
choose Assign New Material > Blin.
Create 4 cubes change the length to 8 units and space them 2 units apart.
Duplicate the 4 cubes and move them 5 units below.

*Change Bevel settings to Absolute and start with a bevel offset of 0.05
Top Row: Bevel all the edges
1st Cube Top Row: Nothing
2nd Cube Top Row: Bevel all edges with 1 segment.
3rd Cube Top Row: Bevel all edges with 2 segments.
4rth Cube Top Row: Bevel all edges with 3 segments.
1st Cube Bottom Row: Bevel all edges with an Offset of 0.05 units.
2nd Cube Bottom Row: Bevel all edges with an Offset of 0.03 units.
3rd Cube Bottom Row: Bevel all edges with an Offset of 0.01 units.
4rth Cube Bottom Row: Bevel all edges with an Offset of 0.005 units.

Turn in 2 images to your blog,
1. A shot of the 8 selected cubes showing the edges.
2. A shot of the cubes, not selected, and with the smooth preview active.
In a new Maya project, create 4 new cubes change the length to 8 units and space them 2 units apart.
1st Cube: Bevel all edges, use offset of 0.05 units.
2nd Cube: Bevel the edges on the ends, use offset of 0.05 units.
3rd Cube: Bevel just the edges on the sides, use offset of 0.05 units.
4rth Cube: Do not Bevel.
Bevel:

After the Smooth Preview. < 3 > on the Keyboard
* Look how the bevels are interpreted when the smooth preview is active and check out how you can use it to better control your geometry.


Turn in 2 images to your blog,
1. A shot of the 4 selected cubes showing the edges.
2. A shot of the cubes, not selected, and with the smooth preview active.